Best Subwoofer Box Design for Deep Bass 2019?
In this article, I have given detailed information about how to make?Best Subwoofer Box Design for Deep Bass. The subwoofer box design is important for quality and powerful bass. When I started my research for “Best Subwoofer Box Design for Deep Bass“, I came across the number of subwoofer boxes and 10 Inch Subwoofer Box Design was amazing among all.
?Best Subwoofer Box Design for Deep Bass 2019
10 Inch subwoofer box design, How to make 10 Inch Subwoofer Box??
We will discuss the complete process in two main headings i.e. how to design a 10-inch subwoofer box on a paper and how to make a 10-inch subwoofer box by that design. You won’t have any issue regarding the design and making of the box. That is our promise !!.
Let s start making?Best Subwoofer Box Design for Deep Bass, this amazing box design will amaze you with quality results.
Cost for materials :
The total cost of materials that we will use to construct a 10-inch subwoofer box will be around 25 dollars. So you should have almost 25 to 30 dollars for materials and other stuff.
Time Spending :
Building a 10-inch subwoofer box will cost you a time of around one hour or one and a half our approximately. The time spends may decrease on increase depending upon your productivity, experience and which kind of materials you are using.
Tools Required for Building Best Subwoofer Box Design for Deep Bass
- 1 Jigsaw
- 1 Table saw or circular saw
- 1 Electric drill with bits for pre-drilling screw holes and driving screws
- 1 3/4″ MDF (medium density fiberboard)
- 3 to 4 2″ drywall screws
- 3 to 4 Panhead sheet metal screws (1/2″ and 3/4″)
- 1 box Carpenter’s glue
- 1 Silicone caulk
- 1 Non-hardening rope caulk
- 1 Speaker terminal cup
Choosing your Subwoofer
You must make sure that you are choosing a subwoofer that is easily adjustable in your car. For this purpose, don’t forget to read the manufacturer details written on the box of a subwoofer. The volume of the box will easily tell you how big your enclosure needs to be so that a subwoofer can perform at a maximum level.
For this article, we have decided to construct a box for Honda CR-V. The box won’t take much space regarding the enclosure of the car. That’s why we have decided to choose a 10-inch subwoofer for that purpose and we will be making a box for it. I hope that this box will bring amazing sound when you use it with the Double Din Head Unit.?
Planning Subwoofer Design for Bass :
Now one of the most important things in making a subwoofer box is to design the dimensions of the box correctly so that it can adjust in the dedicated space of your car easily. For this purpose follow these easy steps to determine the dimensions of your 10-inch subwoofer design :
Determine Minimum Depth of Your Box :
In order to start, the first step you will have to do is to measure the depth of the subwoofer and add two inches more to it. This will be the minimum depth of the box you are planning to construct. (Keep in Mind that in this article, the depth of the box is considered as a front-to-back dimension of the box as the woofer will be mounted to the front of the box).
Determine Minimum height and Width of Your Box :
The second step to follow is that you have to measure the frame diameter of your woofer. To make this easy, you can also check the mounting template of your woofer that is included with the manufacturer’s manual so that you can determine the minimum height and minimum width of the front area of your box.
If you are planning on attaching a grille too, make sure that you make an additional space that will be needed in the near future to accommodate the box.
Determine Available Space in Your Vehicle :
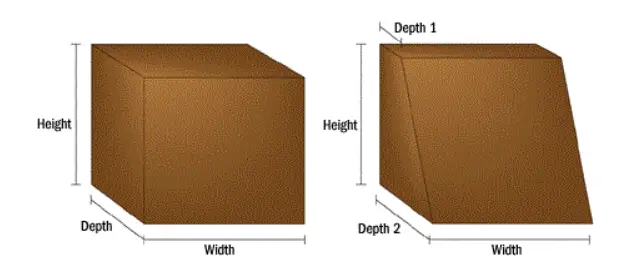
The next step to follow in designing your box is to measure the height, depth, and width of the car’s space that is available to adjust a subwoofer box in. In case if the box is wedge-shaped, you will need to consider the depth at the box’s top and bottom for adjusting it in the available space.
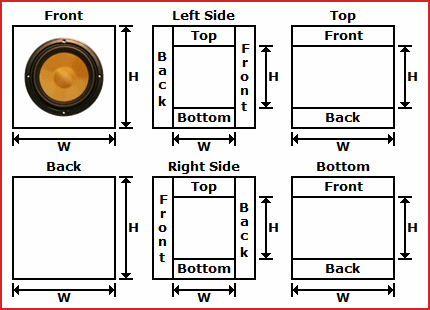
Sketch Out Your Box :
After all the necessary measurements, now is the time to make a rough sketch of your box on a piece of paper using the dimensions that you have collected. The box that we have shown and constructed in our article is rectangular but you can also make a wedge-shaped box according to your vehicle’s accommodation area.
Your sketch will probably look like that in the picture below :
For our example, let us use the following dimensions on planning? to design a subwoofer box :
| Rectangular box | Wedge box |
| Height: 13″ | Height: 14″ |
| Width: 14″ | Width: 18″ |
| Depth: 12″ | Depth 1: 5″ |
| Depth 2: 8″ | |
Determine The Internal Dimensions and Volume of your box :
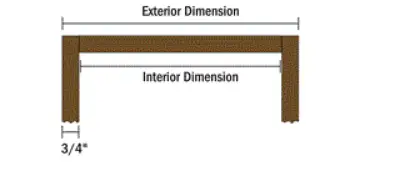
The above steps that we applied were to determine the external dimensions of the box. In order to decide the internal volume of the box, subtract the thickness of the wood that you are about to use in construction.
For instance, if you are using 3/4″ MDF wood (recommended), then you will have to subtract 2×3/4″ or 1-1/2″ from each dimension in order to determine the internal volume of the box easily.
Let’s consider these examples of internal dimensions for instance :
| Rectangular box | Wedge box |
| Height: 11.5″ | Height: 12.5″ |
| Width: 12.5″ | Width: 16.5″ |
| Depth: 10.5″ | Depth 1: 3.5″ |
| Depth 2: 6.5″ |
?Calculate Internal Box Volume In Cubic Inches :
This is where things will get a bit complex. Just keep reading with open eyes and mind and you will easily understand the calculations.?Read this guide about why you should a subwoofer in your car.?
Based on internal dimensions that we have collected from the above procedure, you can easily calculate the internal volume of an enclosure by using the following formula :
Height x Width x Depth = Cubic Volume :
Let’s do some calculation in this regard :
Rectangular Box :
11.5″ x 12.5″ x 10.5″? 1509.375 cubic inches.
Wedge Box :
Since the wedge box has got two depth dimensions so for this purpose we will need to find the average depth before deciding the volume.
To find average depth, use the following formula :
Add the two depths together, and divide them by 2.
Let’s calculate some numbers according to this formula :
Depth 1 – 3.5″
Depth 2 = 6.5″
Adding them both :
3.5″ + 6.5″ = 10″
Dividing them by 2 :
10″/2 = 5″
So, now as we have got the average depth for a wedge shaped box, let’s calculate the formula for volume in cubic inches :
12.5″ x 16.5″ x 5″ = 1031.25 cubic inches.
Convert Cubic Inches to Cubic Feet :
Hence, many manufacturers provide the recommended box volume in cubic feet so you will have to convert the internal volume from cubic inches into cubic feet. For this purpose, we use a simple formula by dividing the numbers mentioned in cubic inches to 1,728.
So let’s take a look :
Rectangular Box :
1509.375/1728 = 0.873 cubic feet
Wedge-shaped Box :
1031.25/1728=0.597 cubic feet.
Adjust Box’s volume to Match Subwoofer Specs :
Now, the next step you have got to do is to compare the volume of the box that you have designed with that of manufacturers suggestion.
You can make small adjustments if the box is too large or too small from that of the recommendation of the manufacturer. Make adjustments in such a way that eventually, the internal volume of the box can match the manufacturer guide as close as possible.
Always adjust stereo settings better sound and music.?Learn here about properly mounting the subwoofer box in the trunk.?
Determine Final Exterior Dimensions of Box :
Once you have taken care of the correct internal dimensions, now is the time that we add back the 1-1/2″ that we have subtracted in step 5 so that we can derive new external dimensions easily.
Always make a double check to be sure that these dimensions will easily fit in your car’s spare space because from now on, we will be moving to construction and if there is any mistake in these steps, you won’t be able to fit the box in your car properly.
Best Subwoofer Box 2019
If you are planning to buy a subwoofer box, access the size of the car subwoofer and that’s it. Here, I have added a variety of subwoofer boxes for you to select. I have decided this segment into four categories based on the size of the subwoofer box.
Our editors have researched and came up with this list:
8 Inch Subwoofer Enclosure
This is a perfect size for any small or medium car. There are many brands which are manufacturing 8-inch subwoofers that are compact in size and yet deliver powerful bass. Click here to buy from Amazon.
10 Inch Subwoofer Enclosure
This is a medium sized subwoofer and a perfect choice for a family car. There are many brands?that are manufacturing quality subwoofer enclosures. Access the space in your car before making a final call. Click here to buy 10-inch enclosure from Amazon.
12 Inch Subwoofer Enclosure
This may be a? large-sized subwoofer with enclosure for few. however, if you have a large vehicle, then why not. There are many brands who are manufacturing these subwoofer enclosures, click here to read detailed reviews.
15 Inch Subwoofer Enclosure
Not many people prefer this huge sized subwoofer. I am using this beast in my Ford and this is just awesome. If you are planning to buy 15-inch subwoofer enclosure, click read to read detailed reviews.
Step By Step Guide for Best Subwoofer Box Design for Deep Bass
Step 1 :
We started the work by measuring and cutting some of the main pieces of MDF from the front, back and top of the box using a table saw or a sharp wood cutting blade.
IF you don’t have any table saw then don’t worry. Just go and buy MDF from a large store and they will do the cutting for you by getting a small amount of fee. You can also use the circular saw but make sure that the cuts are flawless and smooth.
We will cut seven pieces in total. The pieces will be on top and bottom, two sides, back, and two identical pieces on the front.
Step 2 :
After you have cut the pieces, use the compass or the subwoofer template to mark woofer cut out on the front identical pieces.
Step 3 :
If you have chosen to use a double-thickness MDF wood for the front panel, fasten the two identical front pieces with each other using glue and several screws. Doubling the thickness will also make the box hard and rigid.
If you don’t want to use double thickness, you can use the bracing method to strengthen the subwoofer box. The box will be subjected to intense internal pressure, so it is necessary to keep the box hard and rigid.
The easiest way in which you can add bracing is with 2″x2″ strips of lumber. Glue them and add screws where necessary along at least two of the box’s internal seam before you attach it to the top and bottom.
Step 4 :
It’s time to use a drill press now. After using it, we have made a hole near the indoor edge of the circle that we have marked. The circle will be large enough to fit in the jigsaw blade. If you haven’t got a drill press yet, you can use a handheld drill as well.
After cutting out the circle with a jigsaw, woofer opening procedure is now completed.
?Step 5 :
We have followed the same procedure to make a rectangular hole in the back of the box panel. That will hold the terminal cup with ease.?
After using a bead of silicone caulk around the edges of the cup, we have screwed it with metal screws.?I have explained here,?subwoofer size chart?along with features and specifications of different car subwoofers.
Step 6 :
As we have completed the main work for back and front pieces, now is the time to fasten everything. We have fastened the sides of our box to the front and back first, and after that top and bottom sides were added in the last moments.
Step 7 :
We will now fasten all the pieces together using cordless drill and 2″ screws. Some of the glue will squeeze out during this step. You can easily wipe it off outside the box using a wet cloth or rag.?
After gluing and screwing the sides, front, back, top and bottom, we are just about to do finishing the box construction.??
Step 8 :
After you have done the upper steps, now is the step to drop the subwoofer in the box to make sure that it fits. If you think that the woofer is a bit tight to fit, make the use of sandpaper to enlarge the opening a little bit so that the subwoofer can adjust easily.
Step 9 :
With the subwoofer in place, we have marked the screw locations with the help of a pencil. After that, remove the subwoofer and pre-drill holes for mounting screws.
Step 10 :
To make sure that everything is perfect and sealed, we will wait for the glue to dry. After that, we will run a bead of silicone caulk all over the box’s inside seals.
Let the caulk cure for about 12-24 hours before you put the subwoofer back in the opening.
Step 11 :
After the caulk is cured, we will now hook up the wires of a speaker from terminal cup to the subwoofer and place subwoofer back in the box carefully using a non-strengthening rope caulk to seal the subwoofer in.
Final Words About Car Subwoofer Enclosures
I have given the detailed guide on how to make Best Subwoofer Box Design for Deep Bass.
After all the sheer hard work you have done, the box is now ready to be placed in car space so that you can enjoy deep-bass music in the car. Making a subwoofer box is not a complex work only if you have got the measurements right. It is possible that you won’t be able to make a right box in the first try but after two or three tries, you will be experienced enough to make a perfect 10-inch subwoofer box.
We wish you the best of luck in making a perfect 10-inch subwoofer box for your car’s space.
Read here about: